How I Edit my Instagram Photos! (Step by Step Tutorial with Apps I Use)

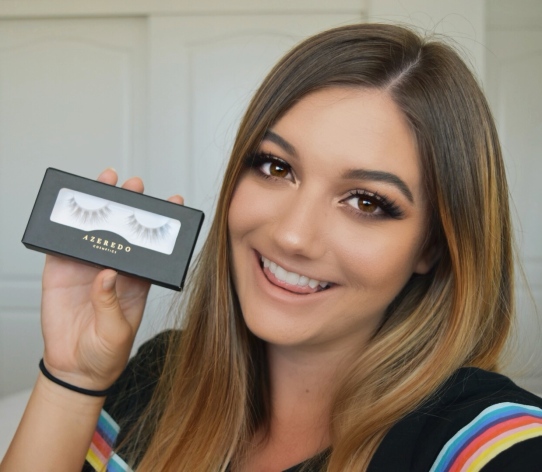
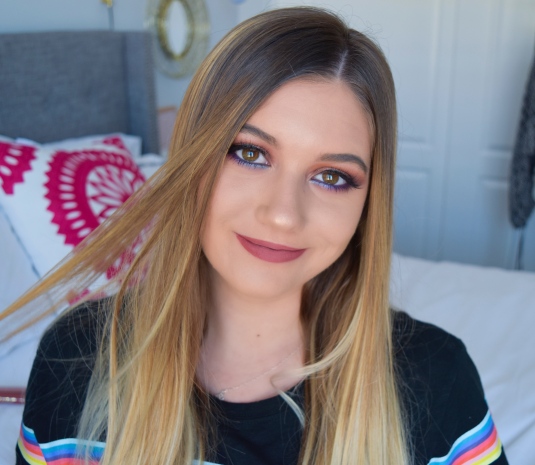
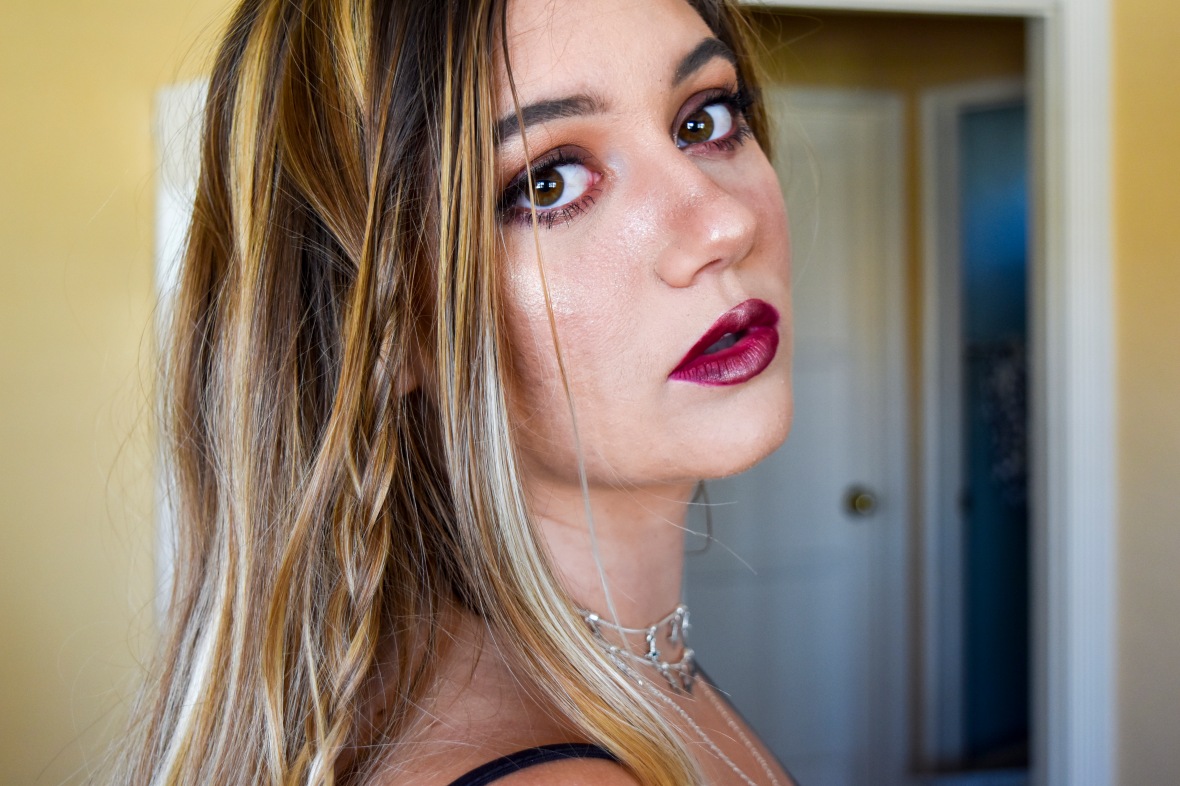
Hey everyone! Happy Monday! Hope you all had a fantastic weekend and are ready to start a new week. You guys have been leaving me the sweetest comments on my Instagram about how I’m editing my photos. I’ve been using some new processes and loving how they’ve been turning out. I think my photos are getting a fairly similar look, so I thought I’d go step by step with what I’m doing. Some apps I use you must have an Adobe Creative Suite account and others are completely free to use without an account like that. I’ll be editing a photo I took the other day down by the pier. You can find the version I posted here. With that being said, let’s jump right into this edit!

IMG_1524.jpeg

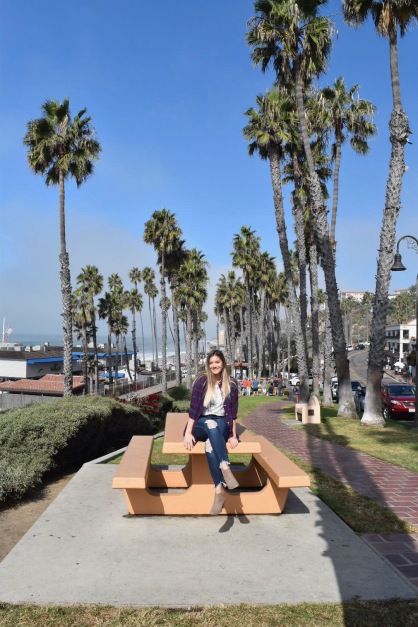
Alrighty guys so here is the original photo, straight from my camera, untouched by any editing apps. This was taken vertically, which I normally don’t do but wanted to get as many of the palm trees in the shot as possible. PRO TIP: I prefer to take my photos from farther away or zoomed completely out because I can always crop them later. As you can see, the colors are kind of dull and this just seems like an average photo. Until editing comes in of course!!

So to start off this edit, I’m going to open my Lightroom CC app, which is part of the Adobe Creative Suite, but most of these adjustments you can make on any other editing app. I simply use Lightroom for the filter I bought on Etsy, which I have an entire post on. IMG_1564.jpeg

So firstly, I will import the photo into the app. The first thing that I like to adjust is the size of the photo. I normally will do the 1:1 ratio crop, which makes a perfect square and will fit Instagram perfectly. However for this photo, I will customize the crop length and go for something more vertical so the palms will be included. Cropping is something you can do on literally any editing app or even in the Photos app which is configured on your iPhone.

IMG_1565.jpeg

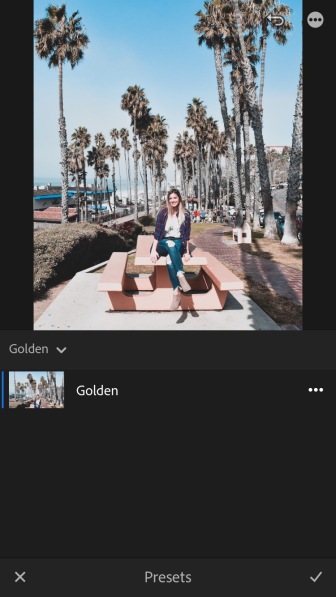
Next, I will apply the filter I use on every one of my photos. This one is called “Golden” and it’s from a preset pack I bought from Etsy. In the post I linked above, you can learn all about how I got this filter into Lightroom from Etsy. As you can see, once the filter is applied it changes the colors quite a bit. It’s a little less saturated and the tones have shifted a bit. I prefer my colors a little less saturated and tones more on the cool side, which you’ll see later on how I achieve that. The cool thing about the Etsy presets is that you can still adjust aspects like saturation, brightness, contrast, white balance, etc. So what you see here is not set in stone. Every photo is different so the preset will actually be altered depending on the photo.

IMG_1566.jpeg

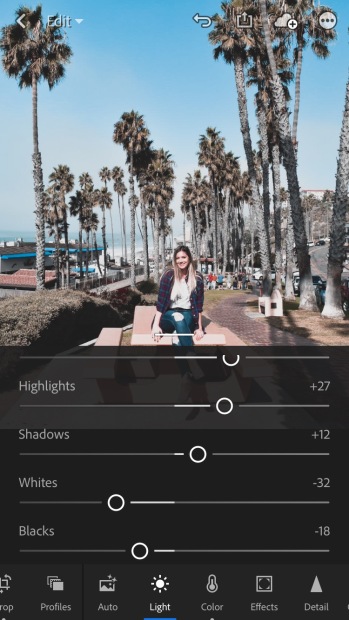
So now I will go into detailing. It’s a bit hard to see here, but my skin actually has some red splotches and I look white as a ghost (which yes, I’m not extremely tan right now but don’t @ me, LOL). So I will go into the “Light” section at the bottom of the screen, where you can find shadows, whites, blacks, brightness, and anything to do with lighting. Since this preset makes my skin look extremely white, I usually have to bring down the shadows and exposure. It’s honestly all about playing with these options and figuring out what works best for a specific photo. I probably spend the most time in the “Light” section trying to fix any bugs the preset may have applied. Normally by the time I’m done the odd marks on skin or anywhere else is gone and we can move on to the next step.

IMG_1569.jpeg

So now I head over to the “Color” tab at the bottom. I usually have to change the luminance in the red tones, which helps fix that reddish color in my skin. Usually the orange tones need adjusting as well, which helps bring a little more color back into your skin tone. I’ll then head over to the teal and blue colors for adjusting. I’ll bring down the hue of both of them, which changes the color of my jeans and the sky quite a bit. I prefer them to be more on the teal side than the navy side. Of course, my jeans aren’t actually that color as you can see in the original, but I personally think it’s a great color and matches my Instagram theme. If you look closely, it changed the hue of anything that was the color of my jeans in the photo. For example the ocean is now more teal as well as the lining of the roof in the background and the blue in my flannel.

IMG_1570.jpeg

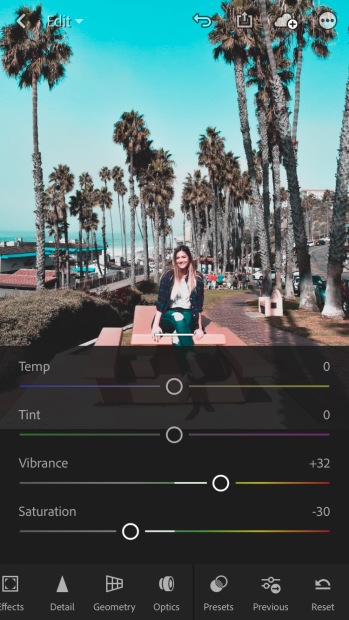
Now for the final step (in the Lightroom app) is to make small adjustments with vibrance and saturation. If I think any of the colors I changed are too much, I simply bring down the saturation or vibrance. Similarly, if I think the colors just aren’t there yet, I’ll bring up the saturation and vibrance. So simple! As I mentioned before, it’s all about playing with these settings and finding what works best for the colors in your photo. I will also keep in mind some of the colors that are already in my feed and try to match them as best I can. Once all of this is done, make sure to SAVE what you’ve just edited.

IMG_1573.jpeg

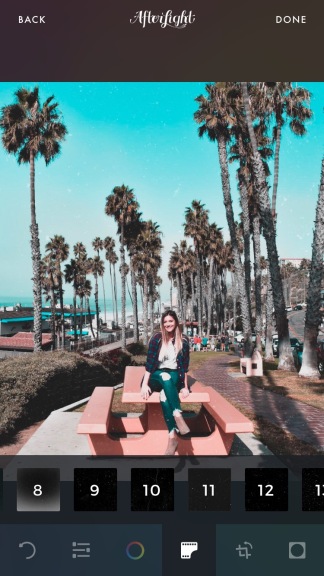
Okay guys we’re switching it up and heading over to the Afterlight app. This is where I apply subtle dusty filters, which gives a bit of a vintage effect. It’s something you can see on almost all of my photos on Instagram, as well as many other Instagrammers. These filters in Afterlight are accessible to anyone. At the bottom you’ll see a little film icon, which is where you’ll find dusty filters, light filters, and more! I go to the dusty section, where there’s a ton of different types of “dust.” Some have more specs, some have less, some will apply a faded effect to your photo, others will darken. It honestly all depends on the photo for which dusty filter works best. For today’s edit, I used #9, as I thought the placement of the dust specs looked nice. You can rotate and flip the filters depending on your photo. You can totally skip this effect, but it’s simply an extra step I like to take with my photos.

IMG_1574.JPGIMG_1575.JPG
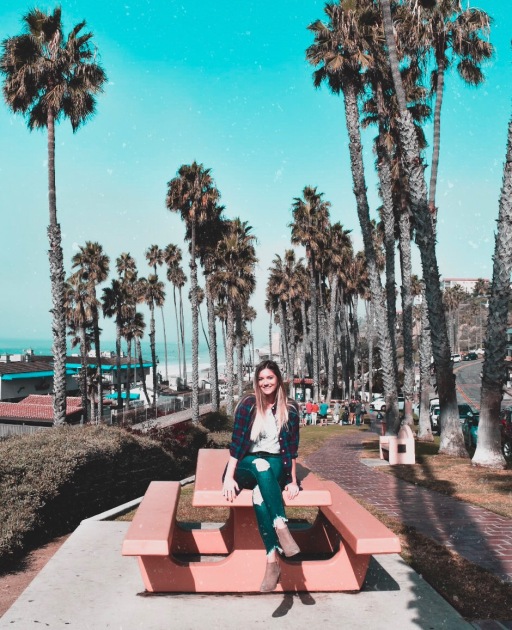
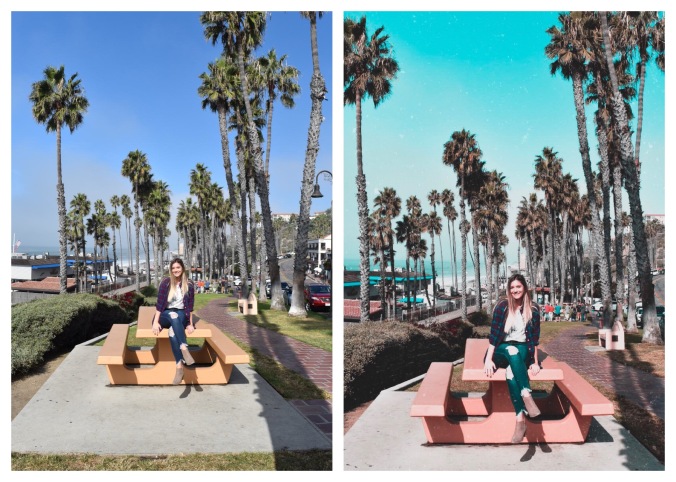
So here is the final edit and a side by side! As you can tell, a lot of the ones have changed a bit to my preferences. Editing photos in this way definitely takes some time, but I personally find it very fun to watch a photo transform and added to the rest of my theme. It’s all about finding fun in being creative and not simply “doing it for the gram.” Let me know what you think of this edit or if this post was helpful to you! If you guys have any questions regarding editing, please leave them below! Talk to you all soon and have an amazing week! xx

signature.png

Follow me! Instagram | Twitter | YouTube | Tumblr | Facebook

How I Styled My Azeredo Lashes (Discount Code Included!)

Hello loves! For today’s post I wanted to share an amazing product with you from an awesome lash company: Azeredo Cosmetics. When I saw their lashes on the site, I was completely hooked. These aren’t your day to day Target lashes. They are completely handmade, cruelty free, and can be reapplied up to 15 times! That is unheard of and I love it! Better yet, 5% of their profits go to the Cancer Research Institute. It’s amazing that this company wants to give back to such an amazing cause. If you want to know more and checkout their selection of lashes, head on over to the Azeredo Cosmetics website.

Now for the exciting part! They have been kind enough to provide my readers a discount code to their lashes. Yes, special for my lovely little fam on this blog! If you find a pair or two (or three) that you love, use the code SAGE10 at checkout for 10% off your order. Not only are their lashes completely affordable but you’re also getting them with a discount! We love a good deal and you’re helping me out as well! Okay, now onto the makeup look and how I styled them!

Facetune-2.jpg

Facetune-7.jpg

I bought two different styles: Legendary and Doll. The first is a very dramatic, full lash that forced me out of my comfort zone and I fell in love with them. Doll is more natural and fluffy, perfect for day to day wear. In this post, I’m wearing the Legendary lashes. I love how they flare out towards the end; this makes them super flirty and perfect for a night out on the town! I wanted the lashes to be the center of attention, so for today’s look I went for a brown/neutral color palette and I think it was the perfect backdrop to display the elegance of these lashes. I used the brown/tan shades from the Jaclyn Hill palette.

Facetune-4.jpg

With my delivery, the Azeredo team included an adorable note. These are little details that I really appreciate when it comes to companies. I’m sure it didn’t take long to write this up, but it really shows a lot of care that is between the company and their customers. Of course, this is the Graphic Designer in me speaking. On the left is the Doll lashes and the right is Legendary.

Facetune-6.jpg

Facetune-3.jpg

This specific pair of lashes has a black band (compared to commonly used clear bands) which was very different for me. However, it gave the effect of black eyeliner which was super convenient because I didn’t have to apply any across my lid (I added the tiniest bit on my inner corners to make the lashes appear more natural). I paired this brown toned eye look with a natural lip using MAC’s Honey Love, a classic! On Instagram live, I actually created this entire look so be sure to check out my Instagram for future live makeup tutorials!

Facetune-5.jpg

If you’d like to purchase the Legendary lashes, I’ll drop a link here. If you’d prefer the more natural Doll lashes, check them out here. Azeredo also offers a variety pack of their lashes, what more could we ask for?

You guys know I’ve been getting more and more into makeup/beauty lately, so this has come at the perfect time. I will only promote a product I truly love to you guys, and these lashes are definitely one of them! I find them so gorgeous, especially because they give back to a great cause. They are also saving you tons of money simply because they can be reused so many times! Again, use my code SAGE10 for 10% off your Azeredo lashes. Let me know down in the comments what you think of this look! Also be sure to drop any questions you have about the lashes down below, I’ll be answering them! Talk to you guys soon!

signature.png

Want more? Here’s my socials! Instagram | Tumblr | Twitter

“The Little Mermaid” Inspired Makeup Look! (Collab)

Hello lovelies! It’s finally time for a collaboration post! The theme for this collab is our favorite Disney movies, so we each chose a particular film and created a look based on it.  This post was made in partnership with EmilyBurnsMUA, she has a great love for makeup but is also an extremely sweet person! Definitely check out her blog (linked above) and what Disney movie she chose to create a look on (here). Thanks so much Emily for working with me and brainstorming such awesome ideas!

Since I have lived very close to Disneyland my entire life, I am very familiar with the park and have grown up watching movies from them. “The Little Mermaid” has always been my favorite movie from Disney, since I related to the ocean theme so much. I spent my childhood either in our pool, in the ocean, or on the sand so it seemed fitting to try and create an Ariel inspired look. At first and after a bit of research, I attempted to create a look from the colors of her tail, which is a beautiful green/teal shade. However, green was NOT the color for me and simply wasn’t working. However, I love the shade of her little seashell top, so I created the look you’ll see today! Makeup is all about trial and error, but when you create a look you adore, it’s all worth it!

littlemermaid5.JPG

littlemermaid4.JPG

As you can see, I got very into the bright blues and purples. I’ve never done a look quite like this before, but I really love how it turned out. I used three palettes to achieve this look: Naked 3 from Urban Decay, the Purple Palette from Kylie Cosmetics, and the Jaclyn Hill palette.

Firstly, I placed a light pink shade from Naked 3 with a Morphe fluffy brush to work as my transition shade. I then took a slightly darker mauve color from Naked 3 and placed it along my crease to blend into the transition shade. I then cut my crease with a creamy concealer from Nars.

Image.jpglittlemermaid3.JPG

After cutting the crease, I took a metallic dark blue shade from the Jaclyn Hill palette and places it on my outer V and inner corner to create a halo effect. I also ran this color along my crease to blend with that beautiful mauve shade. These two blended together a lot better than I was expecting! Of course throughout this entire look I would have to go back with past colors and blend to make sure everything looked seamless and airbrushed.

I then took a rounded flat brush, sprayed it with the Urban Decay All Nighter setting spray and dipped into a bright teal metallic from Jaclyn Hill. That was placed on the very center of my lid and blended with that dark blue. Quite a bit of blending took place between these two to create the perfect halo eye! To darken up the look, I took a burgundy/purple shade from the Purple Palette and placed it ever so slightly on my outer V. To add a bit of detail work, I took a light purple and metallic pink shade from the same palette and placed it on my inner corner to blend with the dark blue. Details are everything, people!

littlemermaid2.JPG

littlemermaid1.JPG

Speaking of details, I placed a bit of the metallic teal on the center of my lower lash line. A mix of a couple purple shades were then used on the outer and inner sections of my lower lash line. Make sure to blend that lower line to the outer corner when you finish up the look! The last bit of eyeshadow to be applied was inspired by small details found in “The Little Mermaid” movie, which are the little bubbles you see floating around in nearly every scene of the film! To mimic these features of the ocean, I took a white cream eyeshadow from NYX, the end of an eyeshadow brush, and made small dots along my winged eyeliner and one on my inner corner. I think this really made the look unique to the movie and gives a cool festival vibe. This would also look nice above the eyebrow, if you wanted to go crazy with it for a party or event.

littlemermaid7.JPG

Of course I threw on a pair of my favorite falsies (Eye Spy lashes) and a lovely nude lip from Anastasia Beverly Hills. Also, since I obviously do not have bright red hair like Ariel, I opted for a brick colored sweater that is so insanely cozy. We’ve been getting some chilly weather here in SoCal lately, so it was perfect! I hope this look emanates the vibe of “The Little Mermaid” and that you guys enjoyed! Definitely check out Emily’s look over on her blog and please feel free to leave any comments or questions about products below! Talk to you all soon!

signature.png

Check out my socials! Instagram | Tumblr | Twitter

Elementals: Fire Inspired Makeup Look!

Hello everyone! Today is the start of my new makeup series, woo! These specific posts will be called the Elementals, because each look will be inspired by a special element found in nature. That is: fire, water, earth, and air. For the very first post in this series, I thought I’d start with fire! I wanted it to be very clear that this look emanated the vibes that come with a flame. That is, hues of yellow, red, pink, and a dark purple (which reflects the smoke of a fire). I kept a very simple technique, layering from light shades to dark. Since it was so smoky, the rest of the look is without eyeliner, but with very feathery lashes.

IMG_8071.JPG

Facetune.jpg

I began with a gorgeous yellow/orange shade from the Jaclyn Hill palette to act as the lightest transition shade. I used a fluffy Morphe brush to apply it and bring it out towards the end of my eyebrow. Using a couple pink/red tones from the Modern Renaissance palette, I blended those into the transition shade and moved closer towards my lid. Then comes the tricky part!

Facetune-3.jpg

Facetune-1.jpg

Taking a dark purple shade from the Urban Decay Naked Basics (extended) palette, I packed on the color directly to my lid and blended upwards. I did my best to make sure the pink blended seamlessly with the purple. Although I will admit, this takes some time when you’re dealing with such a dark hue. Don’t give up though, blend blend blend! If there is one trick when it comes it makeup, it’s blending. Most people don’t use this technique enough! Lastly, I took a tiny bit of black eyeshadow and placed it on the outer V and on my inner corners, just to smoke everything out even more.

Facetune-2.jpg

For lips, I used a liner and lipstick from the brand ColourPop. I absolutely love ColourPop, I don’t have enough of their products! Similar to Morphe, it can be found online and it is priced very well, which makes the brand accessible to so many people (including students on a tight budget). This is not a matte shade however, so when wearing it for hours I will probably place a bit of translucent setting powder over it. Just to ensure no smudging takes place.

elementals_fire.JPG

Facetune-4.jpg

For a highlight, I used a gold and rose gold shade from the Urban Decay After Glow palette. I love the shades in this palette, but unfortunately they don’t give a blinding highlight that I’m looking for. Still pretty, though!

This look was inspired by @atarahmayhew on Instagram. Let me know if you enjoyed this post and are excited for the rest of the Elemental makeup looks! Did you get a fiery vibe from it? I didn’t go the expected route and use a lot of red shades, so let me know if you prefer this smokey look instead!

signature.png

Let’s connect! Instagram | Tumblr | Twitter


New Beauty Series Coming Soon and Collaboration Opportunity!

Hello everyone! For today’s post I actually wanted to announce a short series I’ll be starting on the blog. As you may know, I’ve loved creating makeup looks and you all seem to enjoy them or want some tutorials. So I thought a cohesive series would be one of the best ways to showcase some inspired makeup looks. I won’t announce the theme of the series yet, but I think it’ll be a great opportunity not only to practice my makeup skills, but hopefully give you ideas for your own looks as well. I want to find different ways to explore and share beauty on this blog, whether that is through different series or through collaborations. With that being said, if you love beauty/makeup and would like to work with another blogger to create different looks, please contact me through my email (sageoliviablog@gmail.com) or comment below! We can brainstorm and of course think up the perfect posts together!

I also wanted to share a quick makeup look with you guys today. The funny thing with makeup (at least for me) is going in with a specific idea in mind, and the look going in a completely different direction. That’s exactly what happened to me this time around, but I still think it turned out pretty cute and very wearable.

Facetune-12.jpg

I used very warm tones in the crease as well as a gray/smokey color from the Urban Decay Naked Smokey palette. This was my first go at a halo eye, which is placing shades at the outer corner of your eye, but also the inner corner. This leaves an empty space on the middle of the lid for a metallic or glitter shade. I went for a rose gold glitter and a classic gold shade.

Facetune-11.jpg

Facetune-10.jpg

I made my winged liner a little longer than I normally would, but a dramatic look deserves a dramatic wing, right?! I also layered dark blue and teal glitter shades on top of each other for a bright and colorful under eye. Lastly, I put on a pair of Eye Spy lashes from Dani Mansutti. This was my first time trying these lashes, and I love how gorgeous but natural they look! That’s very important when I’m buying lashes; I adore that extra flare falsies give, but I don’t love when they look too thick or too fake.

Facetune-14.jpg

I finished off the whole look with a warm lip color. I used a brick tone from Tarte and layered a nude shade from Anastasia Beverly Hills on top. I made sure to concentrate the nude shade at the center of my lips to create a light to dark effect. It’s very subtle, but these shades worked well together. It was a bit difficult to blend them together to create a gradient because they are both matte shades. Once everything was complete, the look actually ended up matching my t-shirt very well which was great for photographs!

Let me know what you guys think of this look! If you have any questions about anything makeup related that you’d like me to create a tutorial on, please let me know in the comments! Again, if you’re interested in a collaboration please reach out to me through email or in the comments letting me know you’d like to be involved (and of course include some ideas if you’d like!) Talk to you all soon!

signature.png

Hey, follow my socials here! Instagram | Tumblr | Twitter

James Charles Inspired Makeup Look!

Hello, loves! I am SO excited to share this makeup look with you. It really pushed my makeup skills to the next level and gave me an opportunity to work on my technique. I’ve found the more I play around with makeup and practice, everything comes together so much better in the end. It is actually very similar to painting, which I am very familiar with and I think has helped when it comes to my makeup journey. Beauty and style really is an art and I’ve been learning that more and more often!

Recently, I’ve been into watching James Charles on YouTube. While he is quite eccentric, he is an extremely positive person and I appreciate his motivation and backstory so much. He has a lot of great tips when it comes to makeup and has really helped me learn specifically how to apply eyeshadow properly and beautifully. With that said, I adored his last look and decided to give it a whirl! I will leave a link to his video where he completes this look here. Keep reading to see how my own look turned out!

Facetune-6.jpg

Facetune-8.jpg

I didn’t watch James’s video while I created this look, so all of the colors I matched as best I could to his and applied them in the most logical sequence possible. This look involved more colors than I’ve ever used and more blending than I’ve ever done! (Blending is key, make no mistake!) I started with oranges and deep burgundy tones near my brow bone and the crease to start, beginning with the lightest shades and working into the dark. I also created a cut crease with concealer before I dove into the purple shades and the blue hues.

Facetune-3.jpg

Facetune-7.jpg

I even decided to add a little pop of black shadow at the outer corners of my eyes to really deepen it up. In James’s look, the corners are very smoked out while the inner corners are bright and sparkling. I didn’t have any large sparkles to place over the shadow, but I used a light pink highlighter from Kylie Cosmetics to really make that blue pop and shine!

Facetune-5.jpg

I also made sure to repeat these colorful shades on the bottom lash line. I do this with any makeup look because it ties everything together and adds that extra sense of professionalism. I again started with the lighter shades and moved the darker ones up towards my waterline. While concentrating the burgundy shades towards my outer corner, I kept the blue shades toward the inner corner.

Of course, I finished off by highlighting underneath my brow bone and inner corner with Champagne Pop (a gold toned highlighter). I also threw on a pair of falsies, which I’ve been super into lately! I didn’t think they were of much importance, but they really do add a special flare to your eyes! They give an elongating effect, which makes your eyes look extra feminine and pretty. I used the Benefit Roller Lash to blend these into my natural lashes and for my bottom ones.

editted2.JPG

The Jaclyn Hill Palette, Kylie Purple Palette (finally found a use for it, LOL), and the Modern Renaissance Palette all played a part in creating this look. It took quite some time to perfect it, but I’m really happy with the result (it kind of makes me feel like a mermaid!) I’ve seen a lot of videos and blog posts on people recreating the looks of beauty gurus. I’m super interested in making a video like that, so let me know if that’s something you all would like to see! I know I’d have a ball filming it!

Lots more makeup looks and tutorials coming for you guys soon, I really enjoy making content like this! Talk to you in the next post and good luck to those of you taking finals in high school/college in the coming week!

signature.png

More about what I’m up to here! Instagram | Tumblr | Twitter

Dark Glam Coachella Look!

Hello, lovelies! I’m coming at you with another makeup look, this one specifically geared toward COACHELLA! Are any of you attending the festival this year? I’ve actually never been, but I’d love to go within the next few years. Coachella season is super fun, even if you aren’t actually going. I love the makeup tutorials and fashion videos that creators post on YouTube that are Coachella themed, so I thought I’d create a look myself this year! Of course, being me, I went a little dark and vampy. So if you’re into that, keep on reading!

coachella.JPG

So this makeup look actually started off with me experimenting with a new foundation. I rarely ever buy or even wear full coverage foundation, but I’ve been dying to try out the Marc Jacobs Re(marc)able foundation. I’d love to do a whole separate post on it because guys…it’s freaking incredible. Of course I then whipped out an eyeshadow palette and the look was built from there. Here are some themes I was going for with this look: dewey, glowy, glam, bronzed, and witchy with a little desert vibe. This made sense in my head…let me know if you understood any of that, LOL.

IMG_7774_Facetune_19-04-2018-15-26-10.jpeg

Facetune-4.jpg

As you can tell, I went extremely heavy with the highlighter and glitter shadow. I really wanted to do a sparkle/jewel freckles look, but I didn’t have any of those materials. So I opted for the next best thing: glittery eyeshadow on the cheeks, horizontally across the nose, on specific points of the eyelids, and even on the center of the lips (by the way, I’m wearing a Kylie lip kit in “Gorg”). I never do an ultra highlighted look, so this was super fun to create! For this, I used a combination of the Becca x Jaclyn Hill Champagne Pop highlighter and a Colour Pop shadow in Birthday Girl. 

Facetune.jpg

Facetune-1.jpg

Zooming in specifically on the eyes, I used the Urban Decay Naked Heat palette. I made sure to use the lighter shades toward my brow bone and the second to darkest shade on the majority of my lid. I placed the Champagne Pop highlighter on the center of my lid and lower lash line. I also dabbed it in my inner corner, directly under the wing of my liquid liner, and under the arch of my brow. With this look, the more highlighter, the better!

Facetune-3.jpg

Facetune-2.jpg

As I mentioned before, I really wanted this look to emanate a day out in the sun and very bronzed. So of course, I used the Benefit Hoola Bronzer along the usual cheek area, as well as my jaw line, temples, and sides of my forehead. I also used a bit of rosy blush from BareMinerals (I’ve had it forever, so I’m not sure of the name). Combined with the Colour Pop eyeshadow on my cheeks, this left a very sun kissed, almost sunburnt look (which, if you’re going to Coachella, you’re more than likely to get a sunburn). Growing up in Southern California, I spend the majority of my summers sunburnt, so I’ve gotten used to the look, LOL.

After throwing a couple braids in my hair and some bohemian inspired jewelry, I’ve completed my dark Coachella look! Let me know if you like it down in the comments below! Also if you’d like specifics on any of the products I used, don’t be afraid to ask!

*Also, just thought I’d throw this out there, I know the lipstick application on my bottom lip looks a little wonky. Sometimes we get breakouts in the worst places and it messes with our fabulous lip colors. But hey, smile through it right?

signature

Catch me not at Coachella: Instagram | Tumblr | Pinterest

Alter Ego Tutorial!

Hi friends! Thought I’d share another one of my videos on the blog! I’ve really been enjoying filming and editing. So for this week’s video, I created a dual look. One side is my everyday makeup look, and the other is a darker “alter ego” look. The darker shades were actually super fun to work with, while also being a challenge! I don’t normally wear black, so it was awesome to mix it up a bit! If you’d like to follow me on YouTube, that would just make my day and I normally subscribe back! Hope you all are having the loveliest of days, and I’ll talk to you soon! xx

Sage Olivia on Youtube!

Hi loves! So recently I have been super active on YouTube again! YAY! For some reason I have been super drawn to YouTube lately, and I’ve really been loving filming and editing videos. They’ve been mostly beauty based, although I have some very unique content that will be released soon! Anyhow, I wanted to share one of them with you today, which is a makeup look completely created with the Anastasia Beverly Hills Modern Renaissance palette. As you know, I’ve been obsessed with it lately, so I thought I’d try it out and film while I’m at it! If you enjoyed, please let me know or head on over to my channel and hit that subscribe button, it would mean the world to me!

Modern Renaissance

Follow my blog with Bloglovin

Hello loves! So usually the only eyeshadow I use is any of the Urban Decay Naked palettes. However, I decided to step out of my comfort zone and pick up a new set of shades from a different brand! Shocking! Anyways, I have fallen in love with the Anastasia Beverly Hills Modern Renaissance palette. It is the perfect mix of glamorous and terra cotta tones. Lately I’ve been really into the red shades to bring out any sort of green in my brown eyes. This palette is perfect for that, but you can also have a ton of fun mixing the oranges with the reds and yellows. If you follow me on Instagram, you saw my review of the palette along with swatches!

VSCO Cam-1.jpg

IMG_3209.JPG

In my opinion, Primavera is the most gorgeous shade (bottom row, third to the left). It is extremely pigmented and can be toned down with some of the mauve shades or glammed up with the pink tones and some winged eyeliner. I can’t wait to experiment more with this palette; the formula is very creamy and easy to apply as well as being quite buildable. It also came with a two sided brush: one end is a smaller detailing brush and great for the crease, and the other is a fluffy brush which is great for blending or applying color near the brow bone.

I also really appreciate the packaging (again, that’s the Graphic Designer coming out in me). The entire palette is made of a pinky velvet material, that gives it a total Renaissance vibe, apart from the colors which, to me, totally reflect that specific era. Let me know if you guys would like to see some makeup looks with this palette, since I will be using it nonstop! Hope you enjoyed, talk to you all soon! xx